README from GitHub, GPL-2.0
Elektron Digitakt 2 & Digitone 2 macro-mode
Eight performance macros for the Elektron Digitakt II and Digitone II. Hold PAGE and press MOD, and encoders A–H become eight macro knobs. Each macro moves up to four sound parameters, on multiple tracks you choose. They work like the stock modulation: they ride on top of the sound and don't change your kit. This is especially useful when using the Digitakt as a MPE sound module.
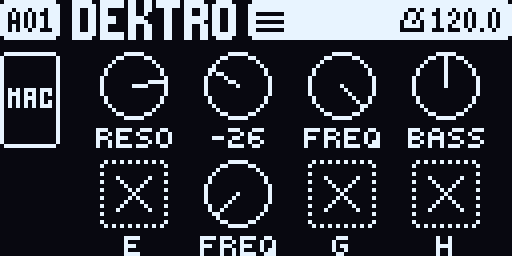
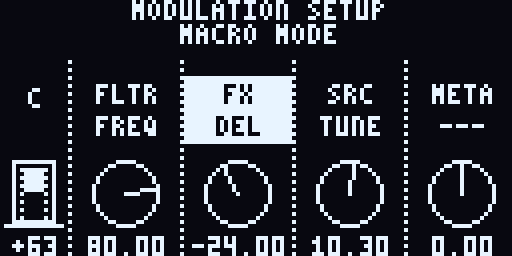
[!WARNING] Experimental. This version runs on a Digitakt II (tested on a unit). The Digitone II version has only run in an emulator, never on a unit. This is unofficial custom firmware: you use it at your own risk, and it is not made or supported by Elektron.
What you need
- A Digitakt II on OS 1.17 or a Digitone II on OS 1.12. Other OS versions won't work.
- The matching official OS file (
.syx) from Elektron's website. - A computer with Linux or macOS to build the firmware. There is no ready-made download: the result contains Elektron's firmware, so it can't be shared. You build it yourself from your own copy of the OS.
Using it
Macro screen
| Do this | And |
|---|---|
| Hold PAGE + press MOD (or MOD + PAGE) | Macro mode opens: MOD lights blue |
| Turn encoders A–H | Move that macro (−64 … +63). A macro with no parameter yet shows a dotted square with a cross |
| FUNC + push an encoder | Open setup of that macro |
| FUNC + push and hold an encoder | Name the macro |
| Turn LEVEL/DATA | Move all eight macros together |
| FUNC + NO, or push LEVEL/DATA | All macros back to the centre |
| MOD, or another page key | Leave macro mode |
Setup screen: FUNC + push an encoder opens the setup of that macro.
| Do this | And |
|---|---|
| Encoders A–D | Choose what parameters 1–4 control, from a list like the stock modulation setup |
| Encoders E–H | How far each one moves (its depth, positive or negative) |
| LEFT / RIGHT | Select one of the four parameters |
| Trig keys | Choose the tracks the selected parameter acts on (lit red) |
| NO or MOD | Back to the macro screen |
The macro setup is saved on the unit and comes back after a restart.
One setup per project, or one per kit
In SETTINGS > PERSONALIZE > MACRO SETUP you choose where the macro setup lives:
- PROJECT (default): one setup and one set of knob positions for the whole project.
- KIT: each pattern's kit has its own setup and its own knob positions, which come on with the pattern (while playing, when the new pattern starts). A kit without a setup starts as a copy of the current one; a kit whose macros you haven't turned yet has its knobs at the centre.
The knob positions are part of the setup: they're saved with it, inside the project, and come back when you load the project. The unit's autosave keeps them across a restart along with the rest of the project. Switching between the two loses nothing: the project and every kit keep their own. Copying a pattern or a kit takes its setup and knob positions along. Projects saved with an earlier build of macro-mode open fine, but their macro setups are not read (the format changed to make room for the positions).
Your projects stay safe
- A project saved with macro-mode still opens on the official OS. It just has no macros there.
- A project from the official OS opens with macro-mode; its kits start without macro setups.
- The macro setups are stored in spare room in the project file that the official OS leaves empty. If something else has already put data there, macro-mode leaves it alone and shows MACRO SETUP CONFLICT.
Installing
You build the firmware file yourself, on your computer, from Elektron's official OS: tools/build.sh patches
macro-mode into the OS file you give it.
-
Install the tools: Python 3.9 or newer, Git, a C compiler and the ColdFire (m68k) cross-compiler.
- Ubuntu or Debian:
sudo apt install python3 git gcc gcc-m68k-linux-gnu binutils-m68k-linux-gnu - macOS: the Xcode command line tools (
xcode-select --install), then with Homebrew:brew install python m68k-elf-gcc
- Ubuntu or Debian:
-
Get this project with the loader it builds with (the
--recurse-submodulesmatters: the loader is a submodule, and without it the build stops with "third_party/elekloader is empty"):git clone --recurse-submodules https://github.com/toonst/digi_macro.gitAlready have it? Update both: in the
digi_macrofolder,git pulland thengit submodule update --init(a pull alone keeps the old loader). -
Download the official OS from Elektron's website: Digitakt II OS 1.17 or Digitone II OS 1.12, exactly that version. If the download is a
.zip, give the build the.zipitself or the.syxinside it. The build knows the file by its checksum and refuses any other version or a changed file. -
Build. In the
digi_macrofolder, give the build the OS file (or both, one after the other):tools/build.sh path/to/Digitakt_II_OS1.17.syxIt knows from the file which device it is for, and ends with
== firmware ready (send it to the unit as an OS update; keep it to yourself: it holds Elektron's OS) …/digi_macro/out/macro-dt2.syxout/macro-dt2.syx(Digitakt II) orout/macro-dn2.syx(Digitone II) is the firmware file. It holds Elektron's firmware: keep it for yourself, don't share it. Everything else the build makes is inout/build. If something goes wrong:It says Then no such file: …The path to the OS file is wrong no ColdFire compilerStep 1: the cross-compiler is missing (or set ELEKLOADER_CROSSto its prefix)third_party/elekloader is emptyStep 2: git submodule update --init… not a stock firmware elekloader knows(orthe zip holds no stock firmware …)Not Elektron's OS file as published … macro-mode needs a Digitakt II OS 1.17 or a Digitone II OS 1.12Another device or OS version: step 3 Anything else, such as BUILD FAILEDorREFUSEDNo firmware file was written. Open an issue with the whole output -
Flash it as you would an official OS update: connect the unit over USB, open Elektron Transfer, select the unit and Connect, drag the
.syxonto Drop files here, and press YES on the unit. Don't turn it off until the update is done. -
Check it worked: hold PAGE and press MOD. The header should say "Macro Mode".
To rebuild after an update, repeat steps 2 (the update) and 4: the new file replaces the old one in out.
Going back to the official OS: send the official .syx the same way. If the unit doesn't start, hold FUNC while
powering on, press TRIG 4 (OS UPGRADE), and send the official .syx with Transfer's legacy OS upgrade mode, over the unit's
MIDI ports (not USB).
Good to know
- Macros are for playing live: they can't be recorded or parameter-locked, and they never change the saved sound.
- Machine-specific parameters (on the Digitone II, all synth parameters) and the LFOs can't be chosen as macro targets yet.
- Building without the per-kit setups:
MM_KITS=0 tools/build.sh …. Then there's one setup, kept on the unit.
More
- docs/DEVELOPING.md: building, checks, storage details and the code's layout
- docs/STATUS.md: what's done and what's open
- docs/TESTING-ON-A-UNIT.md: a checklist for trying it on your unit
- SPEC.md and PLAN.md: what it should do and how it was planned
Built with elekloader, tested in digikit's emulator and on a Digitakt II. Licence: GPL-2.0-or-later (LICENSE).